
At the Zoo: A Fun & Layered 12-Photo Scrapbook Layout | Debbi Tehrani
Things are getting a little wild on this Central Park Zoo scrapbook layout, where animal photos, playful layers, and fabulous Bramble Fox Perspextives come together to tell the story! For this layout, I used the new At the Zoo title, adoraable etched Animals and Mini Animal Words, along with Crocodile Stencil #45, which is also available as part of the Wild Life Stencil Collection.
I was especially excited to meet up with some of my Bramble Fox teammates in New York City, and one of our many adventures was the Central Park Zoo. I always scrap in an 8 x 8 format, so you may notice that Bramble Fox products look a little larger on my layouts than they would on a 12 x 12 page—which makes all those gorgeous details really stand out!

Giving the Background Some Bite
Of course, I had to give that fabulous At the Zoo title a starring role! I started my layout by using the Crocodile Stencil #45, which gave the background some subtle texture and a little bit of color to add contrast with the off-white title. I love how the stenciling creates interest without competing with all those busy animal photos. This stencil is also available as part of the Wild Life Stencil Collection, which includes four stunning animal-inspired prints. And because my journaling includes a few details about some of the interesting wildlife we saw, the whole page really does feel like a little visual snapshot of our zoo adventure.
Because the journaling block was fairly narrow and tucked right up against the photo strip, I decided to align the text flush with the right margin instead of the usual left alignment. That small change helped the journaling sit more naturally in the space and kept the edge of the text visually aligned with the photos.
💡 Debbi’s Design Tip: When you have a large title in a light or neutral color, try adding a subtle pattern or color behind it. It helps the title pop while still allowing it to remain the star of the show.
💡 Debbi’s Design Tip: Let your space dictate your journaling! I usually align my journaling to the left, but this narrow block was pressed right up against my photo strip. By aligning the text flush right instead, the journaling fit the space much better and created a cleaner visual edge beside the photos. Sometimes breaking the “rules” is exactly what a layout needs!

A Dozen Memories, One Wild Story
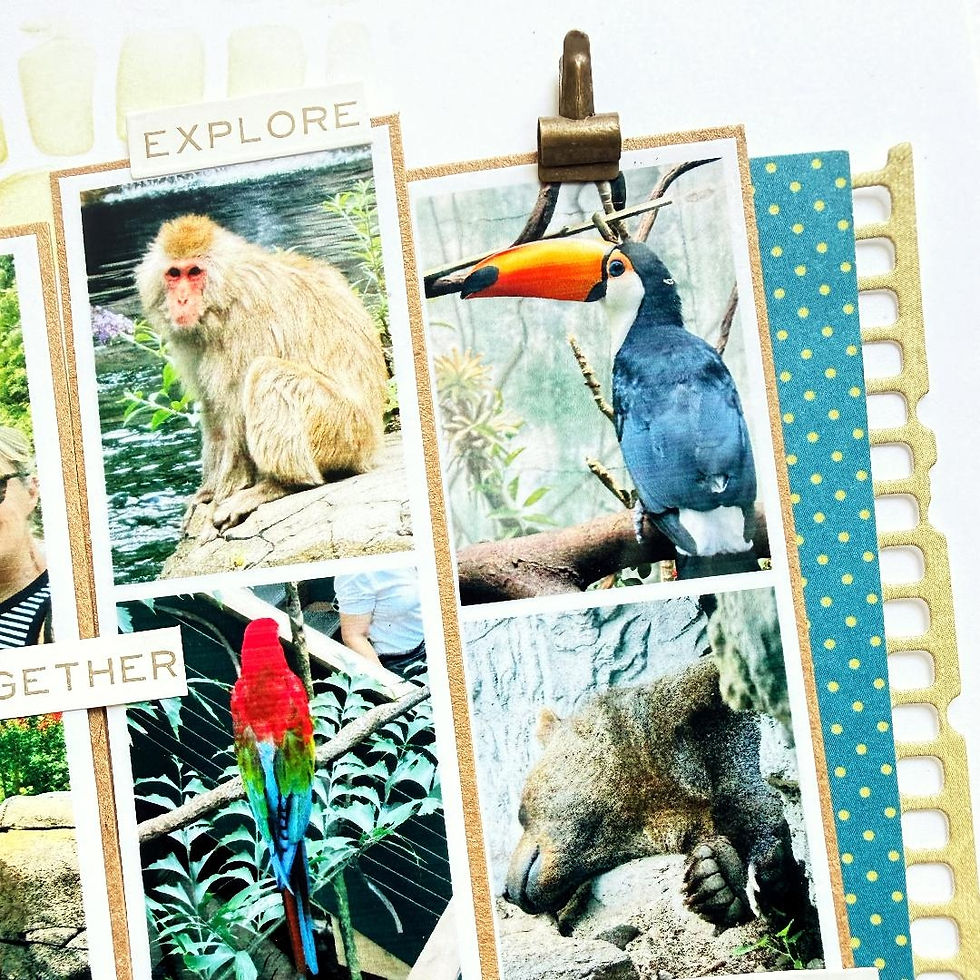
I had so many photos from this excursion that narrowing them down was definitely the hardest part! I finally chose twelve favorites and arranged them into three photo strips. I wanted the overall palette to feel natural and earthy, so I kept the foundation fairly neutral but added pops of teal for some extra color. I matted the photo strips on kraft paper for a little contrast and then added a border to match the stenciling made with an older Bramble Fox film strip border die. I love that combination of the kraft, teal, greens, and warm animal tones—it feels just right for a zoo layout.
The beautifully detailed etching on the cute Bramble Fox animals adds even more personality to the page. Seriously—how cute is that giraffe? I created three embellishment clusters around the layout to form a visual triangle, then added Safari Mini Words and a leaf die to each cluster. Those repeated elements help connect the three areas and encourage your eye to travel around the page instead of getting stuck in one spot.
💡 Debbi’s Design Tip: When you have lots of photos on a layout, try creating a visual triangle with your embellishments. Repeating similar colors or elements in three areas can help the whole page feel balanced and intentional.

A Lion’s Share of Personality
Here’s the top-left cluster—and how adorable is that etched lion? I love how much personality is packed into these little Bramble Fox pieces! The Safari Mini Words have 10 words in the 2 each of 5 different words in 2 colors: a mustard-y gold and a beautiful forest green/teal. Those colors were perfect for this layout and made it easy to bring a little more color into my otherwise natural palette.
I tucked the words into the cluster around the title and layered them with the leafy pieces to create a little scene of their own. I especially love how the warm mustard color echoes the animal tones in the photos while the forest green and teal tie back into the foliage and the pops of teal throughout the page.
💡 Debbi’s Design Tip: Don't overlook word embellishments when creating clusters. They can do more than add a little journaling—they can also help introduce a color, fill a tiny space, or reinforce the theme of your layout.

Monkeying Around with the Title
Here’s the bottom cluster, and I couldn't resist giving that little monkey a place of honor! I thought the O in the word Zoo was the perfect spot to hang some twine for the monkey to dangle from. How cute is that winking face? It adds just the right amount of playful personality to the page.
The At the Zoo set includes the title and three sweet monkeys in different poses, so there are plenty of possibilities for creating fun little scenes. I love embellishments that can be incorporated into the design rather than simply placed on top, and hanging the monkey from the title makes it feel like he belongs there.
💡 Debbi’s Design Tip: Look at your title letters and other elements for unexpected places to attach embellishments. Sometimes a little piece of twine, a dangling accent, or an element tucked behind a letter can turn a simple embellishment into part of the story.

When “Done” Needs Just One More Thing
One of my favorite tips is to leave my layout overnight and look at it again the next day with fresh eyes. Sometimes I think a layout is finished, only to notice something the next morning that would make it even better. That's exactly what happened here!
I decided the layout needed just one more bit of texture, so I added these tiny bronze clips—one on top of the right photo strip and another tucked onto the bottom of the left photo strip. I also added some word stickers from my stash. They're small details, but they add another layer of texture and help the page feel finished without making it feel too busy.
💡 Debbi’s Design Tip: Give your layout a little breathing room before declaring it finished. Stepping away and coming back with fresh eyes can help you spot those last few details that take a layout from “done” to “finished.”
This Central Park Zoo adventure was such a fun part of my time in New York City, and I'm so glad I had the chance to document all those funny, furry, feathered, and wonderfully wild encounters. I love how this layout combines lots of photos with playful Bramble Fox Perspextives, subtle stenciling, and layered embellishments to tell the story without overwhelming the page. From the adorable etched animals to the fun Safari Mini Words and those mischievous monkeys, there are little details to discover all around the layout.
If you're looking for ways to add more personality, texture, and dimension to your own scrapbook pages, be sure to check out all the beautiful new products in the Bramble Fox shop. There are so many fun possibilities for your next layout!
Until next time… keep your memories wild, your stories adventurous, and your scrapbook pages ready to roar!


Comments